Intrigue for the Rose "Intrigue"

I can't take credit for this incredible bouquet of roses. It was on our lunch table at the gorgeous Rose Story Farm Last spring I had the exciting opportunity to visit Rose Story Farm, a real-life rose farm in Carpenteria Valley just south of Santa Barbara, California. Rose Story Farm is a family owned and operated farm which grows 150 different rose varieties amongst 25,000 rose bushes. It has been on my radar since I first saw an article about it in Martha Stewart Living.

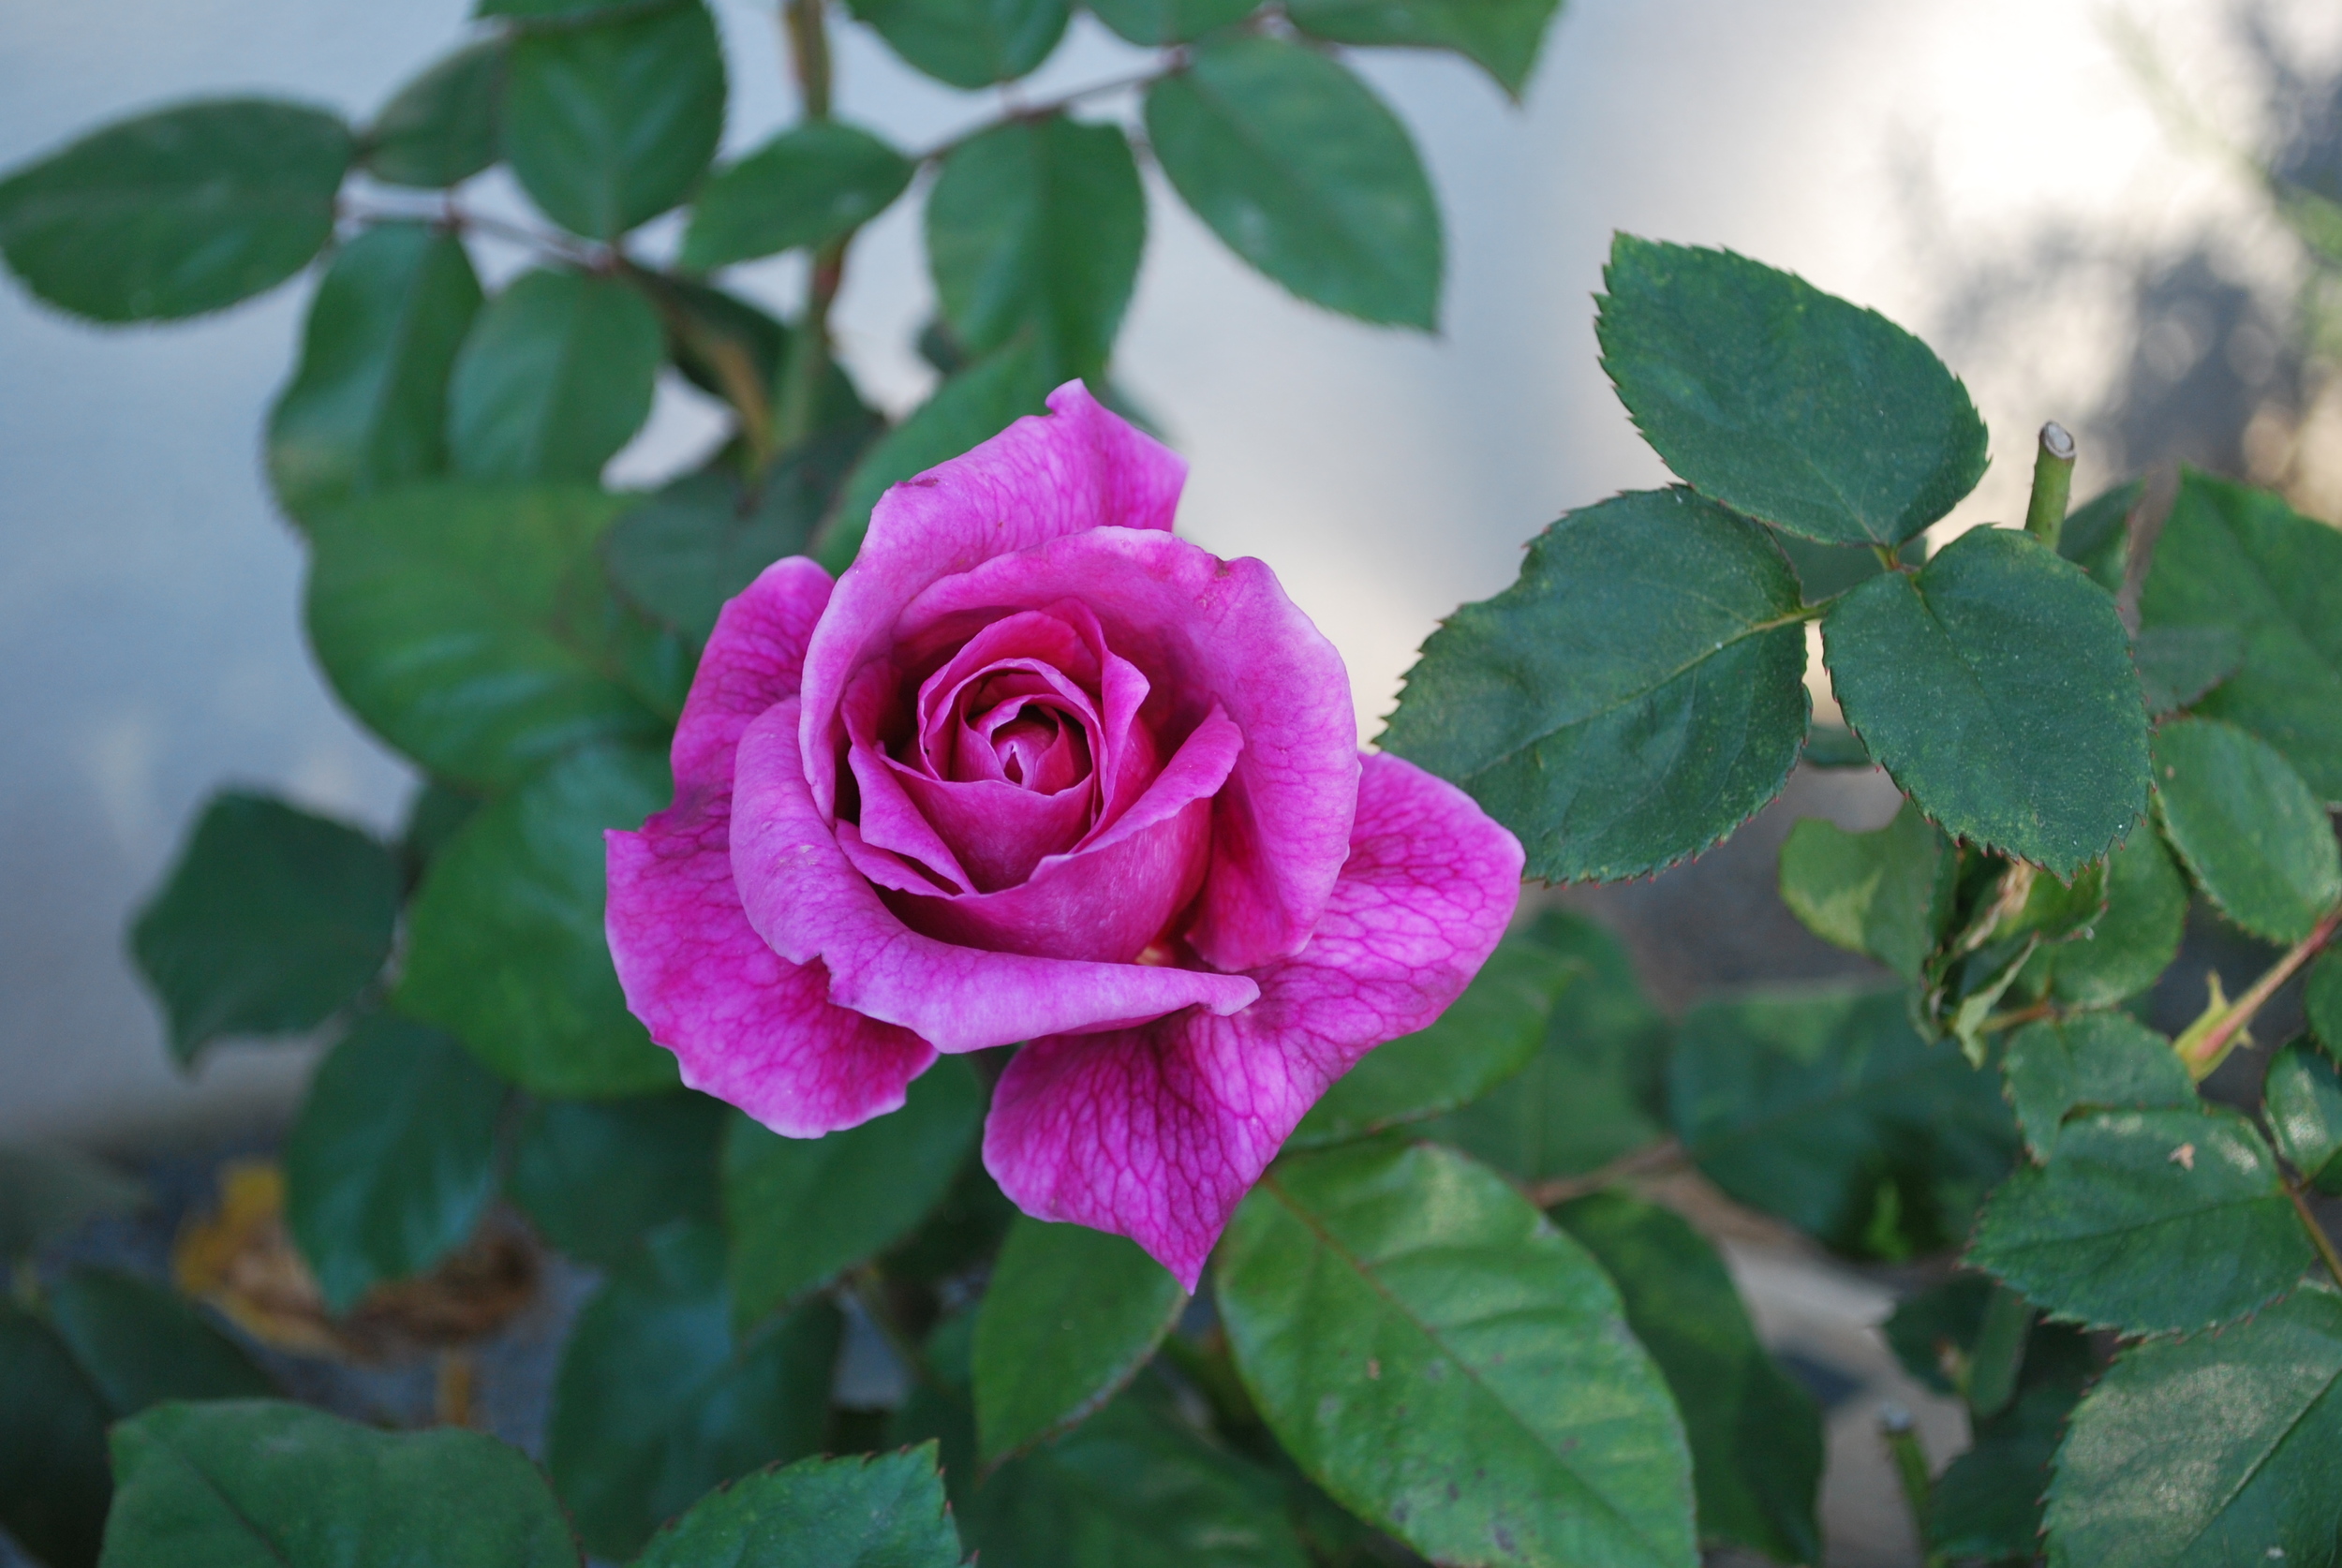
All of these roses are cultivated in soil, cut fresh, and flown all over the country for special events. As you can imagine the variety of roses grown at Rose Story Farm have to meet rigorous standards with very desirable rose characteristics. The mauve rose caught my eye in particular, and I learned it was the "Intrigue" rose. I love the color, and was looking for a great rose for my garden and worked my garden palette.

I was able to find the Intrigue rose and bought several for mass planting curb appeal in the front of my home. It is first of all, a truly striking rose which has small clusters of large, loose magenta blossoms on long stems. It blooms continuously from spring to fall. It is a large rose reaching 4-5 feet tall and 3 feet wide. It's dark plum-tinted foliage is an additional plus, and adds a pleasing color contrast to it's roses. It is  an AARS awarded winner. Here it is blooming to bloom for the first time in March in my garden.

  If you are a rose enthusiast, you must plan on taking a tour at Rose Story Farm. Try and visit the end of April, beginning of May, when the roses are at their height of bloom and beauty. Please share if you have visited Rose Story Farm. Please comment on your favorite garden rose.

Chihuly at Denver Botanic Gardens

I was lucky to catch the last day of the Chihuly Exhibit at the Denver Botanic Gardens, one of the first outdoor exhibitions of artwork by this celebrated American glass artist in the Rocky Mountain region. Chihuly’s sculptures graced the grounds of the Denver Botanic Garden 24 acre oasis in bold colors, contrasting and clashing with the perfect subtle muted hues of the winter landscape. His artwork ranged from unique water features to a 30-foot neon tower. This special engagement went from June 14 – November 30, 2014.

I had heard of Chihuly, but never seen his artwork in person. It is shockingly beautiful, with colors you can't imagine and bold in size. Chihuly is famous for his grandiose architectural installations around the world. Needless to say Chihuly is world renown for his avant-garde glass style as a fine art. If you ever get a chance to see an exhibit of his, don't pass it up.

When you are visiting Denver, don't pass up visiting the Denver Botanic Gardens at 10th & York Street. There is always something interesting growing and going on there.

Please share if you saw this Chihuly Exhibit in Denver. Please comment on how his artwork might affect color and art in your garden.

Boxwood Bonus

We all know how beautiful boxwood can be clipped in a formal garden, but have you thought about using boxwood as literally a very "green" oasis for your floral arrangements? I have a dear friend who is very talented in creating magnificent floral arrangements from her garden. On a recent visit to her showcase garden, she showed me how to use her boxwood from her garden as a way to secure her flowers in their vases. Clipped boxwood anchors your flower stems, looks great especially in your clear vases, and is what I call "garden economizing"--free from your garden.

The added advantage of using boxwood is that it will keep for a long time in your vase, far outlasting your cut flowers. Simply cut boxwood pieces to your desired floral vase or container size. Arrange them under water until your vase is full of boxwood clippings, and next add your cut flowers. The boxwood will hold your flowers in the spot you place them. I love the look, very classic, very green, and very earth-friendly.

Please share if you use a green, alternative to oasis for your floral arrangements. Please comment on which boxwood your enjoy the most.

Seed Sprouting Success

DSC_0894Chances are you have everything at your finger tips for creating perfect seed sprouting success. Sprouting seeds yourself is economical and expands your ability to grow many more varieties.

Materials Needed: 1) Saved plastic tubs with lids and with bottom holes for drainage. Fruit such as berries are often store-packaged in these containers. 2) Potting soil, or seed starting medium. 3) Desired seeds to sprout. 4) A handy chopstick, to make a hole or indention for your seeds. 5) Label gun to label your seeds started and the date. 6) Spray bottle with plain water to mist your seeds in soil medium. 7) Safe place with filtered sun exposure. 8) Time and patience.

I started my saved heirloom pumpkin seeds this way. I simply picked out my desired size plastic tub container. I filled each tub with moistened seed starting medium. I took a chopstick and made my number of desired holes in each tub for my seeds. I then filled each hole with a different heirloom pumpkin seed, and covered the seed over with soil. Once again, I misted each tub again. If you create a label and date for each tub containing seeds, you'll always know what you planted where and when. I keep the container lid closed, as it acts like a mini-greenhouse creating warmth and keeping in extra moisture for your seeds. This further helps germinate your seeds. I placed each tub in a filtered sun spot, in this case, in my potting shed. Every morning I opened the lid of the tub, and misted the seed starting medium, and closed the lid once more.

In about 8 days my pumpkin seeds had germinated and were too tall for me to close their lids. My pumpkin seedlings were now ready to be transplanted to shaped mounds in the ground. Since I started my seeds in my outdoor potting shed, they are already to be planted in the ground. If you had started seeds in your garage or an indoor environment, you might have to include the step of hardening off, or gradually acclimating your delicate seedlings to the outdoors for small periods of time before actually planting them in the ground.

Here is a fun link for more information on starting seeds, Seed Starting For Real People by Kelly Roberson. She suggests starting seeds in an empty egg carton, as an alternative to plastic containers. Roberson also includes a handy chart for Best and Worst Seeds to Sow Indoors and Outdoors. Thanks Kelly for sharing.

Please comment if you have a favorite method for seed starting success. Please share your favorite seeds to start yourself.

Podocarpus Icee Blue

Podocarpus Icee Blue I am in the throes of landscaping my back garden this spring. One of my favorite new additions is the Podocarpus Icee Blue or also called Icee Blue Yellow-Wood, Podocarpus elongates "Monmal'. I love not only the striking blue-gray foliage, but the upright columnar form which is so distinct. I first saw this Podocarpus Icee Blue in a private garden in Oakland, California on a garden tour. Wow, it knocked my socks off. Notice how beautiful the blue-gray foliage looks against the brown color stucco of the house.

This is a slow growing conifer with fabulous upright structure. It thrives in USDA Zones 9-11, in partial to full sun. It likes regular watering, and more in extreme heat. The Podocarpus Icee Blue is slow growing to 15-25 feet, and 15-25 wide if you don't prune it. I find the Podocarpus Icee Blue readily available in local nurseries.

DSC_0272

I have tall house edges I want to soften and necessary drain spouts that I want to hide. I wanted an upright tree that looked dynamite. Since it is so close to my house, I am planting these trees with root barrier material, as a precautionary measure, so I don't have to worry about the roots affecting my building foundation. I'm planting these trees against my white stucco home, which has a wine-colored trim appropriately called "Wild Raisin." I know the color combination is perfect for my home and garden setting.

The homeowner in Oakland planted her two Podocarpus Icee Blue in a container, as an option.

DSC_0289

Please share if you have a special tree in your garden that you particularly enjoy. Please share if you have a Podocarpus Icee Blue in your garden.

Welcoming Appetizers

DSC_0497 When I have guests visiting, I like to serve them two special house appetizers because they are so good and easy to make. Both appetizers can be partially made ahead of time, and then quickly assembled before serving.  Enjoy!


Goat Cheese with Marinated Olives
Recipe Type: Appetizer
Cuisine: Mediterranean
Author: Chef Jenn
Prep time:
Total time:
Serves: 4-6
A simple to make tapenade that is a crowd pleaser. I always double the recipe.
Ingredients
  • 1/2 cup assorted olives (such as Kalamata, Gaeta, and Picholine)
  • 2 cloves garlic, sliced thin
  • 1/2 tbsp fresh rosemary leaves
  • 1 tbsp orange zest
  • 1 tbsp lemon zest
  • 1/4 tsp red pepper flakes
  • 3 tbsp olive oil
  • 2 tsp lemon juice
  • 4 oz goat cheese
Instructions
  1. Drain olives if in brine.
  2. If olives still have pits; with the back of the knife, lightly crush the olives and remove pits.
  3. Combine all ingredients for marinated olives and mix well.
  4. Cover and refrigerate for 2 days, turning and shaking several times.
  5. To serve place goat cheese onto a plate and pour marinated olives over the top.
  6. Serve with warm pita bread cut into wedges or rustic crackers.
  7. *Can be made 5 days ahead. Keep refrigerated until ready to use. Let olive mixture come to room temperature and pour over goat cheese.


 DSC_0496

Six-Layer Bombay Cheese Spread
Recipe Type: Appetizer
Cuisine: Indian
Author: Janet Leutel
Serves: 6-8
Ingredients
  • 8 oz cream cheese, at room temperature
  • 4 oz sharp cheddar cheese, grated
  • 1/4 tsp curry powder
  • 1/3 cup mango chutney
  • 2 tbsp shredded coconut
  • 2 tbsp scallions
  • 1/4 cup toasted pecans
  • 1 1/2 tbsp currants
  • 2-3 apples, cut in thin wedges
Instructions
  1. Combine cream cheese, cheddar cheese, and curry powder in the bowl of an electric mixer. (A food processor works as well)
  2. Mix until well blended.
  3. Shape the mixture into a disk 5-1/2 inches in diameter and one inch high.
  4. Refrigerate until firm, at least 45 minutes or overnight.
  5. To assemble, place cheese on serving tray.
  6. Spread mango chutney on top.
  7. Sprinkle with coconut flakes, nuts, scallions, and currants over the chutney.
  8. Arrange apple slices and crackers around the cheese to serve.


Beautiful Blood Orange

DSC_0660 
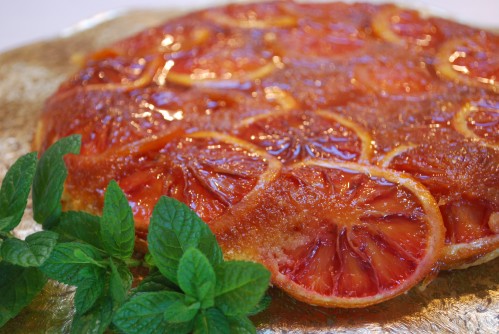
A few years ago I planted a Moro Blood Orange tree, after making this gorgeous Blood Orange Upside Down Cake adapted from the March 2010 issue Bon Appetit. This recipe is simple to make, and calls for creating it in a skillet. Packed with flavor but not overly sweet, it is a perfect way to end a special meal this time of year.

From this recipe, I knew I needed to have fresh blood oranges from my garden every year. Besides the Moro Blood Orange there are two other blood orange varieties available, Sanguinelli and Tarocco.

For those of you in warm sunny climates that can grow citrus, citrus is ripe and readily available this time of year. Lush citrus, especially the blood orange, can awaken your senses and create instant festivity. Grapefruit, lemons, kumquats, and oranges to name a few citrus types can add surprise and zest appeal to many types of dishes and drinks.

DSC_0432

Look how fabulous the Moro Blood Orange is as a juice, or perhaps a ruby garnish. What a great way to make winter vanish in a heartbeat. Blood oranges remind me too of this special time year--Mardi Gras Carnival with all of the hoopla and joyous celebration.

IMG_5298 
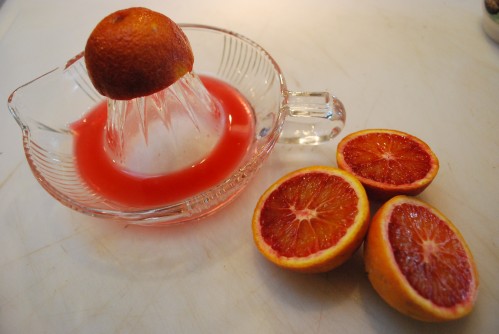
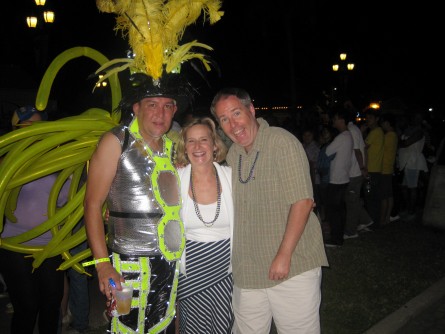
Recently, my husband John, and I had the opportunity to experience first hand the fun and excitement surrounding the celebration of the evening Carnival Parade in the streets of downtown Oranjestad, Aruba in the Dutch Carribean.

White Bean, Pasta and Swiss Chard Soup

DSC_0368 
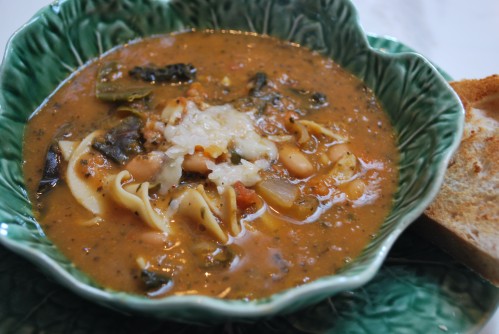
"China tea, the scent of hyacinths, wood fires and bowls of violets--that is my mental picture of an agreeable February afternoon." --Constance Spry I agree, Constance, and what about soup to take the chill out of you, such as one of my favorites, White Bean, Pasta, and Swiss Chard Soup. I saw this recipe in a Williams-Sonoma catalog years ago. It is adapted from Williams-Sonoma Collection Series, Soup, by Diane Rossen Worthington.

It is a nice hearty soup laden with carrots, greens, and thick egg noodles. I use Swiss Chard or kale, interchangeably or combined for this recipe, straight out of my kitchen garden this time of year, carefully rinsed, and cut into julienne strips. So good for you, and tasty is this soup. Garnish it with freshly grated Parmigiano-Reggiano Cheese, and a thick slice of toasted whole grain bread. It is so easy to make, it is a perfect winter soup to keep you going and glowing.

Please share if you have a favorite winter soup. Please comment if you are a fan of Diane Rossen Worthington and her cookbooks.