Bake With Bloom, Bite-Size Desserts

Carole Bloom's Latest Book, Bite-Size Desserts If you or any of your loved ones has a sweet tooth, you must know about my long time dear friend and baking expert, Carole Bloom. Carole is a European-trained pastry chef, confectioner, chocolatier, and best selling author of nine cookbooks.

Her latest cookbook, just released from Wiley in April 2009, is Bite-Size Desserts. Carole is riding the wave of one of the hottest food trends in this country today, small desserts that deliver big delectable flavors. Bite-Size Desserts, has a lively and lovely format, beautiful mouth-watering photos, and a total of 87 tantalizing recipes.

I had her book one week, and had already gleefully made "cornmeal-dried cherry scones", "wicked brownie bites", and "raspberry-blueberry crisps".  Below is a special treat for all of you,  Carole Bloom's "Cornmeal-Dried Cherry Scones" recipe. Enjoy. For book and purchase information, click on, Bite-Size Desserts: Creating Mini Sweet Treats, from Cupcakes and Cobblers to Custards and Cookies

Carole Bloom's "Cornmeal-Dried Cherry Scones"

"I love to use cornmeal in baking because it provides lots of texture. It works deliciously with the dried tart cherries in these scones. These are lovely for breakfast, afternoon tea, and as a snack. They taste best when warm and can be reheated in a 350 degree oven for 7-9 minutes."

MAKES 2 dozen 2-inch round scones.

Ingredients: 3/4 cup (3-1/4 ounces) all purpose flour 2/3 cup (4 ounces) fine yellow cornmeal 1 tablespoon (1/4 ounce) plus 1 teaspoon granulated sugar 1-1/2 teaspoons baking powder 1/8 teaspoon kosher or fine-grained sea salt 2 ounces (4 tablespoons, 1/2 stick) unsalted butter, chilled 2/3 cup (3-1/2 ounces) dried tart cherries 1/3 cup plus 2 teaspoons heavy whipping cream 1 extra-large egg, at room temperature 1/2 teaspoon pure vanilla extract

Adjust the oven racks to the upper and lower thirds and preheat the oven to 350 degrees F. Line 2 baking sheets with parchment paper or nonstick liners.

*** Pulse together the flour, cornmeal, 1 tablespoon of sugar, baking powder, and salt in the work bowl of a food processor fitted with a steel blade.

*** Cut the butter into small pieces and add it to the four mixture. Pulse until the butter is cut into very tiny pieces, about 30 seconds. The texture should be sandy with very tiny lumps throughout. Add the dried cherries and pulse a few times to mix.

*** Use a fork to lightly beat 1/3 cup of cream with the egg and vanilla in a liquid measuring cup. With the food processor running, pour this mixture through the feed tube and process until the dough forms itself into a ball, about 30 seconds.

*** Dust a large piece of waxed or parchment paper with flour and turn the dough out onto it. Knead the dough briefly and form it into a round about 3/4 inch thick. Dip a 1-1/2 inch round plain-edge biscuit cutter in flour and use it to cut straight down through the dough and lift straight up, without twisting, to form the scones. Twisting seals the edges of the dough and keeps the the scones from rising well as they bake. Gather the scraps together, knead briefly, and roll and cut the remaining dough into scones. Transfer the scones to the lined baking sheets, leaving at least 1 inch of space between them so they have room to expand as they bake.

*** GARNISH

Brush the tops of the scones with the remaining 2 teaspoons of cream, taking care that it doesn't run down the sides and under the scones. If it does, wipe it up because it can cause the bottoms of the scones to burn. Lightly sprinkle the tops of the scones with the remaining 1 teaspoon sugar.

*** Bake for 9 minutes. Switch the baking sheets and bake another 9 minutes until the scones are light golden. Remove the baking sheets from the oven and cool the scones completely on the baking sheets on racks.

*** KEEPING Store the scones in an airtight plastic container between layers of waxed paper at room temperature up to 4 days. To freeze up to 4 months, wrap the container tightly in several layers of plastic wrap and aluminum foil. Use a large piece of masking tape and an indelible marker to label and date the contents. If frozen, defrost the scones overnight in the refrigerator and bring to room temperature before serving.

MAKING A CHANGE Add 1/3 cup of coarsely chopped toasted walnuts or pecans with the cherries. Replace the dried tart cherries with dried cranberries or dried blueberries.

Congratulations Carole, on your new Bite-Size Desserts cookbook! It is such a delightful cookbook to read, as well as bake with. Your flavor combinations are genius. Please visit www.carolebloom.com for more information on her cookbooks, classes, and schedule.

How To Compost In Your Backyard

Compost Bin And Ready Compost

Would you like to do something great for your garden, rewarding for you, and green for planet earth? It is called composting. It is very easy to get started. One, you save money on conserving water and not having to buy commercial fertilizers and soil amendments. Two, you enhance your soil health, fertility, and inhibit weed growth. Three, your gardens will require less water because the soil is able to retain water moisture more efficiently. Four, by composting and recycling, less of all of this is going into land fills, and the organic humus material is going back into your gardens for your benefit. Does your city have a "Compost Bin Subsidy Program"? See below.

Everyday I add to my compost, by following my kitchen- to chicken coop- to compost bin routine. First, by my kitchen sink corner, I keep a little open triangle plastic container with drain holes. In it goes my brewed coffee grains and filter, fruit and vegetable clippings, etc. Each morning when I open up my chicken coop for the day, I skim my chicken manure box, adding chicken manure and some pine shaving bedding to the mix. I put all of that in my compost, and layer it with grass clippings, which we heap in a pile outside of our compost bins, after mowing our lawn.

I layer my compost bin with my kitchen additions, chicken manure, leaves from the yard, and grass clippings. The smaller the pieces you add to your compost, the quicker your added materials will break down into compost. I make sure my compost bin mixture is moist. Continue to add water if your compost bin mixture is dry, and rotate it every few weeks with a pitch fork to aerate it. In a matter of 6-12 weeks, especially if you keep your compost bin in a partly shady area and moist, microorganisms break down these materials and create an extremely rich-nutrient dark organic mixture.

The formula for composting is to use about 50% greens, which is the nitrogen or the fire, and 50% browns, which is the carbon or the fuel. This formula does not have to be exact. With the addition of water and oxygen these two elements begin to breakdown and create heat. You might want to splurge and buy a compost thermometer which has a long stem to poke down into the heart of your compost bin, and read the temperature. You want your compost pile up around 120-150 degrees F, to start the decomposition process and kill any weed seeds, etc. Eventually your compost will stop heating up, after it has been turned. This means your compost is nearly ready, and it will benefit by leaving it be, for a few weeks more.

Greens are fruit and vegetable clippings, fresh grass clippings, yard trimmings, egg shells, tea bags, coffee grinds and filters, and breads. Manure is nitrogen, and also considered greens, which is an extra bonus to your compost, but you must add other green to your mixture other than manure. Horse, cow, sheep, and chicken manure are wonderful to use. Be mindful that manure can be "hot", as in potential to burn your plants, if not composted adequately and given time to break down.

Browns are dried leaves, wood materials, ground up branches and twigs, bark, straw, hay, pine shavings, sawdust, shredded paper, and wood ashes. Some browns take a long time to break down such as pine needles, so I do not include them.

What does not go into your compost bin. Think of your compost as vegetarian, therefore no meat, fish, poultry, bones, oils, lard, grease, dairy products. No dog or cat manure, or your cat litter box fill. No treated wood products, charcoal or pressed-log ashes. If you are unsure of something, leave it out.

Space required for composting is about a 3' square area. I have three bins going at one time, so I have more area devoted to composting. Don't forget about the potential for composting at school, or work, too. You want an area which is partially shady spot, and one which is easy to maneuver around in. Locate your compost bin in a "tucked away" but convenient area.

Compost bins can be home-made with simple materials such as stacked pallets, or quarter inch wire mesh 12' long, wrapped in a circle, and held together with a hook and eye at the top and bottom. There are also plans available on the Internet to make them, or manufactured bins available for sale at nurseries, and mail-order.

If you want to start backyard composting, check with your city first to see if they subsidize a "compost bin program". For instance, my city, Encinitas, has been quite proactive in recyling, compost workshops, and encourages residents to compost by subsidizing "Smith & Hawken" compost bins, http://www.smithandhawken.com/catalog/product.jsp?productId=prod21199&categoryId=cat240046p&sku=21199 that normally retail for $129, for only $35 each, limit two per year/per Encinitas household. These compost bins are available for non-Encinitas residents too, for a special non-profit reduced price, price and availability is subject to change. For further information visit, www.solanacenter.org or call, (760) 436-7986, x222.

The City of Encinitas has set aside funds for this program, and has had this program in place for many years now. If your city does not have a "Compost Bin Subsidy Program" like Encinitas, contact your city and ask for one. Make your voice heard. Start with the "Recycling Department" within your city. Does your city have a great "green" program in place, that you would like to share? Do you know of other benefits of composting that haven't been mentioned? Please share your comments.

Composting has made gardening easier for me. It is so delightful to see my gardens flourishing, and every time I dig into my soil, there is another good sign, an abundance of worms.

Repetition Is Design

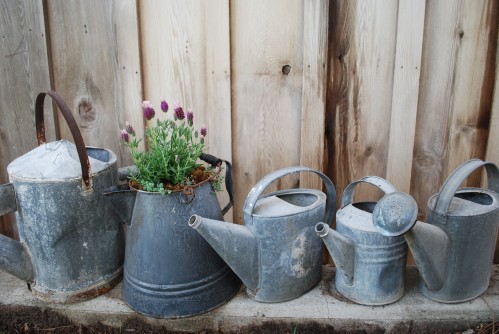
Vintage Watering Cans Make A Statement Have you ever walked into some one's home or garden for the first time, and immediately felt at ease, comfortable, with your senses confirming that this room or space is working in unison? Most likely your host or hostess has beautifully incorporated the basic design principles on purpose or unknowingly by instinct. Generally speaking, the best designed and pleasing spaces, rooms, and gardens, are the ones that have evolved over time, adding a little bit at a time. Remember to adhere to the five basic principles of design as you create your space. They are scale and proportion, balance, rhythm, emphasis, and harmony.

Within the rhythm design principle is repetition. Repetition is created by repeating color, pattern, test, light, or form in your space. Do you notice how much better plants look if they are grouped in mass plantings or at least three's or five's? Have you stopped buying singles of this and that unless for a focal setting? Same principle goes for incorporating your personal style into your garden, home, and personal space. Repetition is design.

Repetition is a very easy way to emphasize your style and with elements important to you in your garden. These beautiful time-worn watering cans would not have half as much "punch" dispersed throughout a garden, as they do punctuated spout to spout.

It can be something as simple as watering cans, container pots, vintage garden tools, rocks, Adirondack chairs, birdhouses, bird feeders, sculpture, antique fencing, glass pieces, and collections. Have you ever seen photos of potting tables with all sorts of terracotta pots in various sizes, stacked and piled together? What a fabulous look, "design by default". I spoke earlier this past fall about "what is your garden style". What kinds of things emphasize your garden style? What do you collect, enjoy, and can be repeated?

What have you repeated in your garden, by design or happenstance that works brilliantly? Repeating favorite things in your garden, home, and space, morphs into design and your style.

Borage Is Bold

Blue Borage Next To Santa Barbara Daisy There is nothing boring about Borage, Borago officinalis. It is the epitome of why herbs are so great, and how you can enjoy them in your garden as well as their many versatile uses.
"Borage is Bold", and has been associated with courage literally, since medieval times by its ability, to make people happy, dispel their melancholy, and comfort the heart.

Borage is an annual garden herb often seen in cottage gardens. It is a culinary herb traditionally, which also has the good fortune of attracting bees with its beautiful vibrant "periwinkle blue" flowers. There is also a white-flowered borage, which is not as common. Borage prefers full sun, little water, and tolerates poor soil. It is a tall plant in the garden, reaching at maturity 2-3' high and and 1-2' wide. Its leaves are hairy and somewhat prickly. It easily self sows in your garden, but does not transplant well.

Borage is a great companion plant for strawberry plants, actually enhancing their fruit flavor and yield. Also, tomato growers will be happy to know that borage enhances tomato vine growth and disease resistance when planted near by. Borage plants are an excellent source of calcium and potassium, so be sure and compost your spent plants.

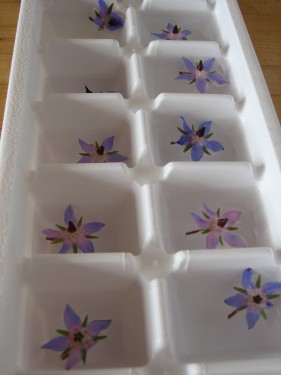
Blue Borage Flower Ice Cubes

Borage flowers are terrific used as a garnish, decorating, and styling. When my borage is blooming I harvest the "periwinkle blue" flowers and make "borage ice cubes". Imagine "borage ice cubes" bobbing in a refreshing homemade lavender-steeped lemonade this summer.

Borage flowers are one of the best edible flowers to use in your home-grown mixed green salad. Sprinkle your spring and summer salads with edible borage flowers, and your salads will "wow".

Candy your borage flowers for decorating and garnish, by crystallizing them for your special occasion cakes, cookies, and tea breads. Harvest and pick off your borage flower heads by gripping the black stamen tips and gently separate the flower from its green back. Rinse and dry edible borage flowers, holding one flower by a petal in your hand, dip a small unused artist paintbrush into a slightly beaten egg white at room temperature, and cover your entire borage flower. Dust your borage flower entirely with a superfine sugar. Let each flower dry completely on a waxed paper surface till free of moisture. This could be a number of days depending on your humidity. Store your dried, crystallized borage flowers in an airtight container. You probably will want to use them right away, but you could potentially keep them as long as a year. Garnish your desired sweet.

Besides borage flowers, young borage leaves have a slight cucumber flavor, and can be used in many types of recipes, too, such as chopped in fresh salads, added to cheeses, with pastas, and as a substitute for spinach.

My enamor with borage is for its beauty and benefit in the garden, and its fabulous attribute as a styling and decorating garnish. Its many additional uses include cosmetic, medicinal, and further culinary uses such as drinks, sauces, jelly, syrups, and more. Be bold with borage, and add some to your life.

Ten Years Of Coffee Cup Thoughts

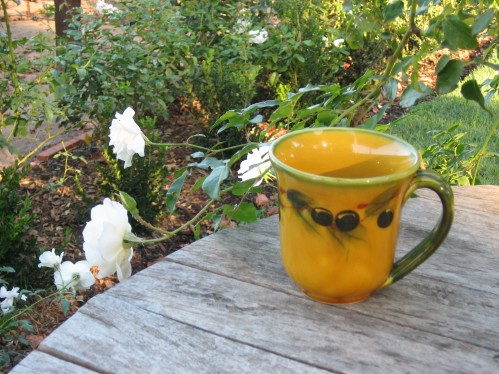
Coffee Cup Thoughts Each morning I start my day in our gardens and opening up our chicken coop for the day. It's early morning, and I am scurrying around to see if any new seeds have sprouted in our kitchen garden, what needs water, what is about to bloom, how my new roses are doing, if what I transplanted recently is doing well, and what chore or project needs to be done. It is also a time I reflect on my gratitude, my blessings, and my bliss. I call these "coffee cup thoughts".

My husband, John, and I have lived here on our cherished property ten years this month. What an adventure it has been and so important a journey in our lives. We feel at one with the massive pine trees so deeply rooted and grounded here. Today is a simple celebration of our time here, and the joy, living here has meant to us. I wanted to reflect on ten special happenings or experiences, one for each year, that have touched our lives, and share them with you.

* Out of nowhere came a first-sighting of a stunning male and female bluebird in our vineyard, curious visitors and eager to follow us aound. It had been almost seven years and nary a sighting of any bluebirds before. Why were they here now?

* Collecting "still warm in your hands" just laid eggs from our happy hens. The indescribable golden goodness and taste of fresh organic eggs, and our sweet "Hollywood Girls" who laid them.

* A stunning perfect rainbow over our vineyard, and the Pacific Ocean to our west. Was the "pot of gold" here? It has happened just once.

* The excitement of our first vineyard harvest, so many years down the road from when it first was just an idea. All the time, classes, care, management, and devotion to our vines, culminating in the beautiful ink-black elongated syrah clusters gloriously dangling from our vines. The grapes were ripe, the brix (sugar %) was right, and each grape was so tasty, sweet, and juicy. Will these grapes transform into great wine?

* Last year's first bite into a delicious ripe fuji apple off of our espaliered tree. Our fuji apple trees had just limped along for years, and then last year, they produced the most "mouth-watering" sweet and crunchy fresh-freckled apples I have ever tasted. Will this year repeat?

* Hearing the first incredibly romantic banter of a pair of equally-matched barn owls. It sent tingling goosebumps up my spine. Will they be back this winter?

* The first sweet wafting scent from my spring blooming patch of sweet peas, so beautiful a natural perfume, and unexpected as I innocently walked by. It totally stopped me in my tracks. Could there by anything more divine at that moment?

*Finding my first hummingbird nest, so very tiny, and intricately engineered. We have some many wonderful and curious hummingbirds that greet and visit with us each and every day. It is reassuring that they make our gardens, their home, too.

*Watching the sun traverse the horizon in ever so gradual increments, day by day, month by month, moving north in the spring/summer, and south in the fall/winter, always setting perfectly into the Pacific Ocean, and reminding us to be grateful for every single day. We had been here several years before, right before our eyes, we saw two looming islands off our horizon. Dry and clear conditions have to be so perfect, we are lucky to see the islands once or twice a year.

*Understanding the art of growing an abundance of home grown vine-ripened heirloom tomatoes. Making our first summer-grilled pizza with fresh oregano pesto, aged gouda cheese, and sliced absolute-perfection "Jubilee" tomatoes.

I have not even mentioned our family and friends that have been so much a part of our time here, too, and shared in the many great times, celebrations, and experiences. Please know who you are, and how grateful, you are in our lives. I would have to write a "book" to cover it all.

These are only ten "firsts", and I could have mentioned so many, many more. Remember to embrace the simple joys and pleasures in your world and garden, as they are gifts for you.

Make Mom Happy With A Rose Plant

Double Delight's First Spring Bloom Does your mom live a "stone's throw" away from you? Are you able to make her and all of your loved ones a delightful Mother's Day Brunch celebrating "her day" with your fresh eggs, delicately poached over heart-shaped polenta, melon-drizzled vinaigrette over arugula greens, blue cheese, and proscuitto, and gloriously ending with fresh berries and sour cream coffeecake? No, does she live out-of-state like my mom? Well, here is a great suggestion.
Stumped what to get your mom for Mother's Day? Say you "love her" with a symbol of love, a beautiful new rose plant for her garden. If you're a gardener, chances are you got your love of "digging in the dirt" from her.

If you haven't heard of Edmund's Roses before, you are in for a treat. Edmunds' Roses has an extensive selection of all kinds of bareroot roses, such as antique roses, floribundas, climbers, tree roses, hybrid tea roses and more. Once ordered, Edmunds' Roses sends out bare root roses, time-appropriate according to your plant zone you live in, so you receive your roses at their optimal time for planting. Prices and shipping are reasonable.

Edmunds' Roses is open year round for orders, and customer service, but actually ship their bare root roses from December through May each year. With Mother's Day less than a week away, you might consider sending your mom a gift certificate from Edmunds' Roses. Your mom can choose what type of rose she would like, what color, and when she would like it to redeem it. Gift certificates never expire and are available by phone only at, Edmunds' Roses, 1-888-481-7673, Monday-Friday, 8am-4:30pm CST.

A rose plant is something living, and keeps on giving year after year. It is a plant of beauty and emotion. Your mom will enjoy her rose and think of you, in her garden for many years.

Edmunds' Roses is a wonderful idea for other occasions besides "Mother's Day", such as the holidays, birthdays, anniversaries, new home, new baby, and thank you.

Please go to Edmunds' Roses for more information and online ordering.

Chickens & Chicken Coop FAQ

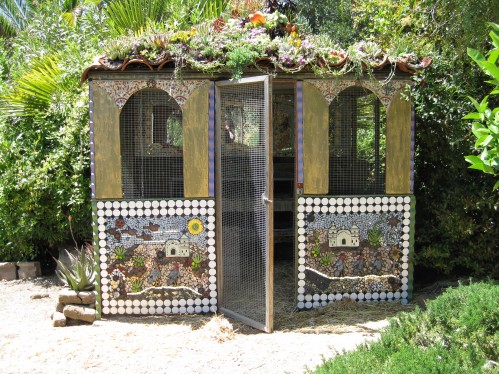
Kathy Lafleur's Amazing Chicken CoopMy dear friend, fellow gardener, and incredible ceramic and mosaic artist, Kathy LaFleur, would only have a chicken coop as befitting as the one in the above photo for her lucky chickens.

Kathy has transformed this aviary into a "palais de poulet" for her hens. On the top of her roof she added roof tiles, and planted beautiful thriving blooming succulents. On the front of her chicken coop she has painstakingly created two unique mosaics. There are more colorful mosaics and mirrors adorning the inside. Notice the two rows of vintage hen nesting boxes in the chicken coop background, and that she uses hay as her preferred bedding material. Hats off to you, Kathy, your creative chicken coop is so inspiring and amazing!

Here are a few FAQ questions from the previous "Backyard Chicken Coop" Series:

What are the best chicken breeds for a backyard chicken coop? It really is your preference, and what your purpose is for having chickens.

My preference for backyard "homesteaders" is the heavy-breed chickens that generally lay brown eggs. Some of my favorites are the Buff Orpingtons, Rhode Island Reds, Barred Rocks, Silver-Laced Wyndottes, and the Black Australorps. The heavy-breed chickens are more docile, friendly, approachable, and are great layers. Ameraucanas lay a pretty blue-green egg, and are a nice choice, too.

If you are pinched for space overall, you might consider the Bantam chicken varieties. They are a smaller chicken that lay large eggs relative to their size. Their space requirements are 1 sq ft/bird inside coop and 4 sq ft/bird outside chicken coop, quite a bit less than the heavy breed chickens at 1.5-2 sq ft/bird inside chicken coop, and 8-10 sq ft/bird for outside pen. Silkies, with their head plumes, and Cochins with their heavily feathered legs are Bantams. I call them designer chickens, pretty and showy, but can be skittish and a bit aloof. You might want to get an assortment of breeds for your backyard flock for variety and fun, but preferably all about the same age.

What is the best floor for chicken coops? Chickens require dry, draft free housing with good ventilation. Ideally you want your chicken coop, raised off of the ground, with sunlight able to access underneath. However, this is not always possible, especially if you have a modified structure or building.

A concrete floor is acceptable, but you must provide ample bedding and make sure it is not damp. A dry, wood floor is acceptable, again with ample bedding. If you are using plywood or wood in general, make sure it is untreated, no chemicals used in manufacturing it. My preference for bedding is pine litter, available at feed stores, because it is manageable and easy to compost with. Hay is another nice choice of bedding. Sometimes your chicken coop design lends itself better to one kind of bedding over another.

An entire wire floor is not ideal, because it can be hard on hen's legs and feet, and manure is dropping where? Wire mesh over the top of your chicken manure box is fine, but not for an entire floor. It also leaves your hen house rather exposed to rodents and varmints.

Where do I position my chicken coop in my backyard? Ideally, you want a quiet corner or spot on your property that is away from your house. It needs to be preferably on a high, well-drained area. You want ample air movement without a draft. Fresh air means fresh oxygen and movement to remove excess moisture, ammonia, and carbon dioxide which hens naturally give off.

It should be an area where the south sun reaches the chicken coop, and the outside pen for a large portion of the day. We have our chicken coop nestled by our orchard, and generally close to our storage shed, and composting area. It is an area slightly removed, but accessible. Fun with landscaping helps muffle sounds from your chickens, and integrates your chicken coop with the rest of your garden.

Chickens are active, and can be remain in their outside pen all day. Remember, if they are laying hens, they will need access to their chicken coop and nesting boxes during the daytime, too. At night time, it is best to tuck your chickens in, by bringing their feed bucket inside the chicken coop, and closing up their outside pen, doors, and windows till morning. Make sure your chickens have adequate ventilation with their chicken coop closed for the night.

When I let my chickens out in my yard, they like to wallow in the dirt. What are they doing? I call it a "dirt bath". They enjoy creating a little basin and laying down in the dirt, flinging dirt over themselves and their feathers. It is a way of cleaning themselves, cooling themselves, and relaxing.

I have a hen who insists on sitting on a "clutch" of eggs for long periods of time. What is she doing? She is brooding, or sitting on her eggs to hatch them. If you have a rooster in your flock, most likely you want fertilized eggs and/or chicks. If your hens sit on fertilized eggs for 21 days, embryos will develop and eventually hatch as chicks.

Even if you don't have a rooster in your flock, some hens will naturally sit or "brood" on their eggs, usually in the spring time. You have a choice to let your hen brood, or collect your eggs as usual. I usually collect my eggs so I know they have recently been laid, and because a hen can actually become emaciated by not moving, eating, or following her regular routine for days and sometimes weeks. Just because you remove all the eggs a hen is sitting on, does not necessarily mean she will stop brooding, too.

I have a neighbor or friend who wants to give me one of her hens that is being picked on in her own flock. Is that okay to do? I have generally had good experience in adopting hens into my flock. I would encourage you to adopt a hen, if the circumstance is right for you, and the hen is generally healthy and in good condition. There is a difference in a hen being pecked at, and a hen that is sick. Introducing an older hen into a younger hen flock usually works well. The adopted hen, can become the "mother hen", and show the others "the ropes".

Why are certain hens being picked on in my flock, and how can I prevent it, stop it? Hens naturally have a pecking order they establish within a flock. Sometimes a hen is perceived as weak, or picked on for no reason at all. If you introduce younger hens into your flock this can be a problem because they are smaller and younger, and unable to defend themselves. Generally speaking, if your flock of hens are the same age, you will have less of a "pecking order" problem. This can be hard as your flock size shifts and you might want to add new hens. Hens like routine, and when new hens are frequently introduced, it shifts the flock dynamics. Also, make sure you are not overcrowding your hens, check your sq ft/bird to chicken coop and sq ft/bird to outdoor pen ratio.

Sometimes it takes just a few days for all of the hens to settle in, and adjust. Sometimes they never adjust, and you might have to separate them in another pen or coop, or isolate them for a period of time, or ask a friend about adopting your hen.

Do you have more questions, comments, stories to share about your chickens and chicken coop?

Orchid Rockrose Shrub

Close Up of Blooming Orchid Rockrose This is another spring blooming delight, Orchid Rockrose, Cistus x purpureus. Although this is a native Mediterranean drought tolerant shrub, something about it reminds me of an English country garden.

Former neighbors of mine had several one gallon Orchid Rockrose shrubs left over from a landscape installation, and asked me if I would like them. Not familiar with the Orchid Rockrose at the time, I boldly mass planted them in an informal hedge, in a sunny dry spot on our property. Besides a beautiful informal hedge, this shrub is suitable for rock gardens, fire-prone areas, erosion-control, and natural settings.

The hedge has grown to about 4' high x 4' wide. It blooms in the spring for about a month with 3" deep pink "happy face" flowers. Each flower has a deep burgundy spot at the base of each petal, with a yellow-orange yolk center. Their flower is very distinctive, and friends always ask me the name of this shrub.

When Orchid Rockrose is not demonstrating its showy bloom, its dark green evergreen foliage continues to please. It is an easy shrub to care for, thrives in full sun, requires little water, and grows quickly in poor soil and adverse conditions such as high heat, winds, and ocean salt air. It does not like a lot of pruning as a mature shrub, but can be top-tipped for fullness, and pruned easily as a young shrub.

  Orchid Rockrose Hedge

It grows well in zones 6-9, and 14-24. There are a number of different species within the Cistus family, with different flower colors, and characteristics in appearance. You can find the Orchid Rockrose shrub in local Southern California nurseries, and online, too. Be sure and start with a small container size, and adequate spacing, as it grows quickly.

If you are looking for a low maintenance, drought tolerant shrub, you might consider the versatile and showy, Orchid Rockrose.